OPOVE M3 Pro Max Massage Gun – Review

OPOVE M3 Pro Max Massage Gun featured image

Disclosure: This post contains affiliate links. I will earn a percentage of any sales made using my links, but there is no added cost to you. These purchases help keep the blog going.

I was recently given the opportunity to review the OPOVE M3 Pro Max Massage Gun. This is the best-selling massage gun on Amazon, with over 9000 reviews and five-stars given by 90% of all reviewers. As an avid runner, I’d seen different massage guns promoted by my local running store. Massage guns are widely used by runners, and other athletes, to provide relief after tough workouts and to prepare for big events. It’s not unusual to have sore muscles after a tough workout or after working a new muscle group. Massage has been shown to provide relief and allow another tough workout sooner. But who has the time (or money!) to get professional massages after every workout? Massage guns allow you to self-massage!


OPOVE M3 Pro Max Massage Gun box


First Impression of the OPOVE M3 Pro Max Massage Gun

Within the exterior cardboard box, the OPOVE M3 Pro Max Massage Gun comes stored within a heavy-duty, zippered carrying case. I was super impressed with the quality of this case and the storage capability. The OPOVE M3 Pro Max Massage Gun set comes with a charging cable, 5 attachment heads for different massage needs for your entire body, and instruction guides. When fully charged, the OPOVE M3 Pro Max Massage Gun has a 4-hour battery life.


As someone not familiar with trigger point therapy, anatomy, or massage, I was glad that the set came with a guide for massaging different body parts. Each body part is marked with  X’s to show trigger point spots to apply the massage gun to for best results. The massage gun can be operated in either manual or automatic mode. The manual mode holds a consistent pressure, with 4 different operating levels. With the auto mode, the massage gun will automatically change the pressure to allow varying degrees of pressure without having to manually adjust.


trigger point therapy manual

Conclusion

While I consider myself, at a minimum, a weekend warrior, the OPOVE M3 Pro Max Massage Gun has strong power and is good for both fitness enthusiasts and people who suffer from back pain. It is extremely light-weight and quiet, even in high-speed mode yet is very high quality. You can also use the gun in either manual or auto mode, so it’s extremely customizable to your needs. Given that professional massages usually start at $1 per minute, the value of a massage gun is priceless!

Self portrait with massage gun

OPOVE M3 Pro Max Massage Gun

WebsiteFacebookInstagramTwitter


Save For Later

pinterest image

Continue Reading

Top 10 Budget Fitness Gift Ideas

Top 10 Budget Fitness Gift Ideas

Disclosure: This post contains affiliate links. While using these links will not cost you any more, I may make a commission on any purchases.

Sure, we all wish we could gift our friends The Mirror Home Workout System or a Peloton, but for the rest of us, check out our guide of the Top 10 Budget Fitness Gift Ideas. Before you start shopping, think about the following questions to guide your search:

  • What types of workouts do they do?
  • Where do they work out?
  • How often do they work out?

Top 10 Budget Fitness Gift Ideas

10. Speed Jump Rope

Jump ropes are all the rage in Bootcamp and Crossfit gyms due to their ability to develop coordination, agility, footwork, endurance and overall conditioning. They are compact, lightweight, and bring back those fond memories of grade school recess. And under $10!

Speed Jump Rope

9. Fitness Dice

For anyone working out at home, it can get pretty monotonous doing the same workout over and over. A fitness dice adds a little spontaneity, resulting in new workouts every day!

8. Running Gloves

Gloves are a perfect Christmas gift because it’s cold outside! Look for gloves that are lightweight, yet warm, with touchscreen capabilities.

7. Fitness Journal

Gym rats love to plan and track their workouts and strength progression. Runners love to track their mileage and plan their training for upcoming races. Journals are a great reminder to get that workout in and motivation to keep progressing.

6. Yoga Mat

Whether hitting their favorite yoga studio or doing a session at home, there is no need for boring yoga mats.

yoga mat

5. Massage Stick

The perfect self-care gift idea! It can be stored under their desk at work or in a closet at home and used to treat themselves to a tension and pressure release anytime and anywhere. It’s a great gift that will keep on giving!

massage stick roller

4. Foam Roller

One thing almost every runner, cardio fan and weight lifter loves but never has at home is a foam roller. Perfect for rolling out tight muscles, stretching, and even some isometrics, this is an amazing Christmas gift for any athlete in your life.

foam roller

3. Socks

Nothing makes a runner happier than new socks! And they are definitely not something they tend to splurge on for themselves. My favorite brands are Swiftwick, Balega, and Zelle.

2. Resistance Bands

Great for the traveler or those with little space, resistance bands can be taken anywhere and provide a wide arrange of workout options for the newbie or advanced user. Most sets are under $10!

Loop Resistance Bands

1. Joggers


High on the trends list for 2020 have been joggers! Think of your old sweat pants, elevated to another level where they are both functional and fashionable. In my opinion, they are the new leggings. You can find budget-friendly joggers at Old Navy, and all the big-name fitness brands have their own too.


Save For Later

Continue Reading

New Trends at the Old Gym – Landmine

landmine

Next up in my series on new trends that you’ll find at your local gym is Landmine!

Landmine – What Is It?

The landmine is a piece of equipment that allows one end of a barbell to be affixed to the ground with full rotation of the other end. Just like a traditional barbell, the open end can be loaded with plates for added weight resistance.

How Do You Use?

Single-Leg Deadlift

Start with feet together, holding the head of the barbell in your right hand. Hinge forward at hips, lifting right foot off the floor and extending it behind you as barbell lowers toward the ground. Lower torso until parallel with the ground or until you feel a stretch in your left hamstring. Squeeze through glute to return to starting position for 1 rep. Repeat on the opposite side.

Half-Kneeling Shoulder Press

Kneel with right foot on the floor, knee bent at 90 degrees, holding the head of the barbell in your right hand with torso upright. Press barbell straight up. Hold for 2 seconds, return to starting position for 1 rep. Repeat on opposite side.

Chess Press

Lie on the ground with feet flat, head of the barbell in your right hand with elbow next to your ribcage. Press barbell upward above your head. Slowly lower back to starting position. Repeat on the opposite side.

Landmine Row

Start in a lunge position with back flat, holding the head of the barbell in your right hand. Row barbell up toward ribcage, keeping movement close to your body. Lower back to starting position for 1 rep. Repeat on the opposite side.

Get Your Own

To include your own landmine in your home gym, you’ll want to make sure you have a space large enough for the length of the barbell plus room to work.

Disclosure: These are affiliate links that will help cover the costs of running this blog with no impact on you.

Grab my current workout utilizing the Battle Ropes!

New Trends at the Old Gym


Check out all the posts in the New Trends at the Old Gym Series!

Battle Ropes

TRX

Save For Later

Landmine PinLandmine Pin

Continue Reading

New Trends at the Old Gym – TRX

TRX

Disclosure: This post may contain affiliate links, upon which I may earn a commission if you purchase anything.

Next up in my series on new trends that you’ll find at your local gym is TRX!

TRX – What Is It?

TRX is a suspension based training system. Using just your body weight and gravity, the TRX system can support up to 350 pounds and provide up to 900 pounds of resistance. The system is attached to a door or other fixed point. The further you lean forward or backward, the stronger the resistance to overcome. You can easily change your resistance by changing the angle of your body to the floor. trx


How Do You Use?

There are 100s of exercises you can complete on the TRX system, but they are all variants of Push, Pull, Plank, Hinge, Lunge, Squat and Rotate.

PUSH

Chest Press – Hold handles in front of you.  Brace your core and lean your weight into the handles, making sure your hips, shoulders, knees, and ankles are aligned. Push back to start.

PULL

Row – Lean back holding handles.  Brace your core forming a strong plank with your shoulders pulled down and back.  Maintaining your plank, pull your chest up to your hands. Lower yourself down in one slow, controlled movement.

trx

PLANK

Inserting your feet into the TRX straps, plank up into a pushup position keeping your hands directly under your shoulders. Brace your core and make sure your head, shoulders, hips, knees, and ankles are aligned. Lower your knees to the ground.

HINGE

Extend arms, pressing down on handles, knees bent. Bend forward from the hips, maintain a lengthened spine, extend the knees. Press on handles, extend at hips to an upright position.

LUNGE

With one leg through both foot cradles on the TRX, ground yourself through your working leg. Push your hips down and back, and lunge down until your front knee is bent to 90 degrees. Keep your core braced and your chest up the entire time. Drive through your front foot using your glutes and hamstring to bring you back up.

SQUAT

Stack your elbows under shoulders, with feet hip-width apart.  Lower hips down and back, weight in heels.  Drive through heels, squeeze your glutes, and lift your chest.

ROTATE

Place arms in a “T”, body in a half-kneeling position. Maintain lengthened spine, shift hips forward, rotate torso away from your rear leg, side bend away. Shift hips back to return hip to neutral, arms down.

Get Your Own

TRX Suspension Trainers are available at the official TRX Training site. Prices range from $100 – $200 for at-home use versions.

Grab my current workout utilizing TRX!

New Trends at the Old Gym


Check out all the posts in the New Trends at the Old Gym Series!

Battle Ropes

Landmine

Continue Reading

New Trends at the Old Gym – Battle Ropes

Battle Ropes

In this series, I’ll be featuring some of the new trends that you’ll find at your local gym (or even for use at home). First up, Battle Ropes!

What Are Battle Ropes?

A battle rope is a long thick rope anchored in the middle with two ends for you to work with. Battle ropes vary in length from 30 – 50 feet, with 1.5 – 2 inch diameters. They are great for working the hands, arms, shoulders, back, abs, core, and legs.

How Do You Use?

While any continuous movement of the ropes will work your arms and core (to stabilize your body), these 3 exercises are a great start.

Waves

Grab each rope with a hand.  Alternate going up and down with your left and right hands, creating waves with the rope. Waves are an effective workout as the work each arm independently and keep your muscles under tension for extended periods. Start with 30 second reps, building up to several minutes at a time.

Stagecoach

Holding both ropes together with both hands, move up and down together like you’re driving an old-fashioned stagecoach.

Overhead Slams

Hold each rope in a hand. Pull them up over your head, then slam them to the ground as hard as you can. Wait for the ripple to reach the anchor point, then repeat.

Get Your Own

Battle Ropes are available at mass online retailers like Amazon.com and Walmart.com, as well as specialized fitness stores. Prices range from $35 – $200.

Grab my current workout utilizing the Battle Ropes!

New Trends at the Old Gym


Check out all the posts in the New Trends at the Old Gym Series!

TRX

Landmine


Continue Reading

Orangetheory Fitness – My First Time & A Review

Orangetheory fitness logo

After talking to several friends and co-workers about Orangetheory Fitness, I finally took the plunge and booked my first session this last Saturday. Even though it’s just treadmills, rowing and weights, everyone raved about how upbeat the classes were and how they couldn’t wait to go back. So, what is Orangetheory?

Orangetheory Description

Taken from Orangetheory’s website:

Orangetheory’s hour-long gym sessions are held in an upbeat group setting which is divided into intervals of cardiovascular and strength training that uses treadmills, indoor rowers, weight training blocks, and floor exercises.

During your session, heart-rate monitors are worn where the data is displayed live on a video monitor for your trainer to see your progress, and to help keep you accountable during your workout. When your heart-rate stays within a specific range, your metabolism is stimulated, your energy increases, and you experience the Orange Effect—additional energy and calorie burn for up to a day and a half after your initial workout!

Our experienced personal gym trainers will give you the right motivation to get you on your way toward your fitness goals. Whether you have a performance based goal such as increasing power, speed, or strength, or simply have a desire to lose weight and tone up in a fun way, Orangetheory Fitness is the perfect place to get you there.

My OrangetheoryExperience

There is an option to request your first class online, but I called into my chosen location to reserve a time. They asked that I come in 30 minutes before my first class to fill out paperwork and get a tour of the facility. They also recommended that I bring a water bottle and sweat towel.

When I arrived, there was a class going on and I could see how positive the trainer was. The reception area was separate from the workout room, separated by a full glass window. The receptionist was very friendly and asked about my fitness goals and how I had heart about Orangetheory. Upon completing the paperwork, she set me up with a heart rate monitor. It was the traditional chest strap model that would be used to monitor my results during class. There were lockers and locker rooms available for use, but I did not check the locker room out. The lockers had keys provided and were large enough to put a small handbag in or extra clothes during the winter, but not large enough for a full backpack. There were also hooks on the wall, if you just wanted to hang up your keys during class.

The receptionist then explained the monitor that was on display in the workout room. It displayed everyone in the class, along with your heart rate and other workout stats. When walking in you moved from gray to blue, then green, to orange, and finally red. Orange is where you were aiming to be. For every minute in orange and red, you would get a splat point. The goal was to get at least 12 splat points during class. This would encourage your body to continue burning calories for the next 36 hours. She also explained the 3 treadmill paces used – base, push, and all out.

When the first class ended, the receptionist introduced me to the trainer Timothy. As it was my first time, he ensured throughout the class that I knew what was going on and how to set up my rower and other equipment. I started the class on Rower 1. Others entering the class could choose to start on either the rowers, treadmills or weight room. Even in the weight room, there were numbered stations, so when you moved throughout class, you stuck with your number, so I moved to weight station 1, then treadmill 1.

The Workout

Every workout is different, but here’s a rundown of some of mine. The first section of the rowing workout consisted of rowing 200m, then performing 2 different squat exercises with a weighted ball, then back to rowing adding 200m. You continued this pattern until time was up. The second section consisted of rowing 200m, then jump squats. Starting with 8 squats the first time, adding 4 each time with 200m of rowing in between.

I next moved to the weight room (really, just a side section of the room next to the rowers, which were behind the treadmills). The weight section of the workout was broken into 2 blocks. The first block included goblet squats, single arm dumbbell snatch, and upright rows. You continued doing these exercises until time was up. The second block was all about abs, using an ab roller.

And the last section for me was the treadmill. Attendees have complete control of their treadmills, with guidance from the trainer. Starting with a few minute of warm up, we next moved into Base Pace for 3 minutes. For a jogger, the recommended Base Pace was 4.5-5.5mph. We then completed 1 minute of Push Pace, which should be about 1 mph faster than your Base. We alternated intervals of Base and Push, with a couple of All Outs included, which should be at least 1mp faster than Push.

Conclusion

OrangeTheory could be my new favorite work out! I signed up for their 4 sessions a month membership. While memberships and pricing may vary by location, the 4 sessions a month started at $59/month. There were also options for 8 sessions a month and unlimited. You do have to purchase your own heart rate monitor to wear to class. One bonus of the heart rate monitor and membership, if it gives you access to a private app where you can wear your monitor for workouts outside of the studio and work towards your orange rate as well. I haven’t tried this out yet, but look forward to it. You can also schedule all your workouts in the studio on the app or online.

I loved the enthusiasm of the trainer and he really pushed you to do your best. While in the weight room, he encouraged me to increase my weight and corrected my form. Given that it was my first class, and I’ve learned from previous workouts to not go all out in the first session, I felt like I could have given more, but still got a great workout. Ended up with 6 splat points. So here’s to earning 12 next time!

Sign up today – your first class is free! Orangetheory’s website

Me @ Orangetheory

Continue Reading

Habitica – Help Build Habits by Gamifying Your Life

I was recently searching for an app that I could enter daily to-dos that would automatically rollover each day to help build some daily habits. I received all sorts of recommendations, but one really stuck out – Habitica. The recommender said it was perfect for someone that likes social games and the idea of gamification. What that means is you earn points and build onto a character for every completed to-do! You also lose health when you don’t complete your to-dos. I downloaded Habitica from the Google Play store, but it is also available in the App Store. When logging in for the first time, it will ask if you are using the app for health and wellness or education or business and provide you sample habits and tasks. You can also fully customize the app with items that you want to accomplish.

Habitica in Google Play Store

Habitica is broken up into 4 sections:

  1. Habits
  2. Dailies
  3. To-Dos
  4. Rewards

Habits sreenshot

Habits

You can set up both Good Habits (things you should do multiple times per day like eat vegetables) and Bad Habits (nail biting). Completing a Good Habit earns you gold and experience, while completing a Bad Habit subtracts health.

Dailies

Dailies

Dailies are tasks that you have to do every day, like brushing your teeth or checking your email. You can adjust the days that a Daily is due by clicking the pencil item to edit it. If you skip a Daily that is due, your avatar will take damage overnight. I’ve been trying to implement a daily workout routine, so added my individual workouts as Dailies. I also have Dailies for different social media tasks that I want to complete each day, like post on Instagram, my business page, and Twitter. You can earn experience points and coins when completing your Dailies to upgrade your character.

To-Dos

I haven’t used the To-Dos section yet, but this is a place to add one-time items. You can add due dates to your To-Dos and you earn experience points and coins for completing your To-Dos.

RewardsRewards

This section allows you to spend your coins on new weapons and accessories for your character.

Social

There is also a social aspect to the game with Parties, Guilds, Challenges and the Tavern. These features allow you to chat with other users and join challenges with the your friends or strangers based on similar goals.

Conclusion

I highly recommend Habitica! It has a great layout and is easy to use. I like that it breaks out habits that can be completing throughout the day (like drinking water) versus daily habits (10 squats, for example). I’m also motivated to complete my Dailies so I don’t lose Health points. Whenever you lose all your health points, you drop down a level and lose your experience points as well.

Continue Reading

Running for Beginners – Top 3 Tips To Get Started

Running - Top 3 Tips to Get Started

Running is one of my favorite ways to stay active. You can do it inside or out. Alone or with friends. You can even do it year-round. But it can be a little intimidating if you’ve never tried before. Here are my top 3 tips for running for beginners.

Running for Beginners

Get Fitted for Running Shoes

I’ve heard it said that running is one of the cheapest sports to get started in because you can do it with what you have. But I highly recommend you go to a specialized running store and get fitted with proper running shoes. This will likely cost you at least $100 but will save you in injury time and pain down the road. And once you know what shoe and size fit you best, you can find cheaper options online. In St Louis, I love Big River Running! They are highly trained in finding the right shoe for you based on how many miles you run a week, what surfaces you run on, and what injuries you’ve experienced in the past.

Running shoe store

Start Slow

It can be tempting to jump right in and push yourself as hard as you can on the first day. Resist this urge. This is the quickest way to injure yourself and/or cause shin splints. Depending on your existing fitness level, your starting point can vary, but I would recommend 30 minutes of walk/run for your first workout. The Couch to 5k program is an excellent training program for individuals just starting to run. It leads you through run/walk workouts that slowly extend the run periods to where you are completely running a 5k by the end of the program. If you are not following a structured program, keep in mind that you should never increase your weekly mileage by more than 10%.

Join a Running Group

I started running with two friends from work. We decided to train for an upcoming 5k to stay active during the busy season at our public accounting firm. You can’t beat the accountability of running with friends. They are going to make sure that you show up when you schedule runs and follow up if you miss a run.

I’ve since joined Big River Running’s Training Team, which is a group that trains for half and full marathons, focused on races in April and October. We meet weekly on Sundays for 12 weeks leading up to each race. I’ve become great friends with many of the people in these groups and meet regularly during “off-season” and at various races around town. Check with the local running stores in your area to see if they offer group runs or training programs. It’s a great way to meet people at the same level as you.

You can also look for local running groups on Facebook and Meetup.com. Check out “Moms/Shes Run This Town” or search <your city> running groups.


What additional tips do you have for someone starting their running journey?


Save For Later

Tips for the Beginning Runner pin Running for Beginners pin Running Tips to get started pin Tips for the New Runner pin

Continue Reading

Daily Mile Challenge

daily mile challenge image

The Daily Mile Challenge. While walking or running for just 1 mile a day won’t be enough to get in shape, it will set you up in the habit of daily exercise. These small changes repeated over time can become permanent habits. And it will take you less than 20 minutes.

During the month of April 2018, join us on Facebook for daily motivation to complete your daily mile challenge. Your daily mile can be running, walking, jogging, cycling, swimming, rowing, anything that you can track 1 mile of travel. Many phones have built in health trackers (like Samsung Health), but you can also download multiple fitness tracking apps, like MapMyWalk, MapMyRun, and Nike+.

daily mile challenge

Tips to Help With The Daily Mile Challenge

  1. Sleep in your workout clothes. I’ve heard this over and over, but never tried it. But I can see the logic. If you are already in your workout clothes, you have no excuse not to workout when you wake up. You are ready to go!
  2. Set an Alarm. Whether first thing in the morning or after you’ve gotten the kids to school, set a time everyday to complete your mile. That consistency of the same time everyday, is just one more step to creating a new habit.
  3. Have a Route Mapped Out. Use Google maps to figure out a route around your block that is 1 mile. Or see how far around your favorite park is.
  4. Hold Yourself Accountable. Find a workout buddy or virtual buddy who will hold you accountable. For every day missed, pay $10 to a friend or charity that you don’t agree with their mission. This should keep you motivated to stay committed to your daily mile.
  5. Create a Reward. On the flip side, you can set up a reward system for completing your mile. Buy a new workout top or get a massage. Treat yourself to a coffee date for every week completed.
Continue Reading

Squats – Benefits & Varieties

Wide Leg Squat

During this last month, I have been participating in a squat challenge – 1,000 squats during the month! With a 31 day month, that was an average of 32 squats per day, which seemed pretty doable. With 8 days left in the month, I still have 400 squats to complete. So, instead of actually working on my squats, I’m going to recap the benefits of performing squats and some different varieties you can add to your exercise regime.

Proper Squat Form

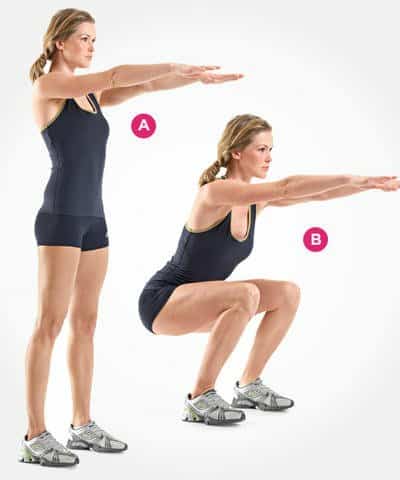
But first, let’s talk about what a squat is and how to perform a proper squat. The movement begins from a standing position. The movement is initiated by moving the hips back and bending the knees and hips to lower the torso, then returning to the upright position. Make sure to keep your chest up and don’t let your knees extend beyond your toes.

Benefits

Adapted from Joseph Mercola’s Fitness Panel, here are the top 8 benefits of performing squats:

  1. Builds Muscle in Your Entire Body

Squats obviously help to build your leg muscles (including your quadriceps, hamstrings, and calves), but they also create an anabolic environment, which promotes body-wide muscle building.

In fact, when done properly, squats are so intense that they trigger the release of testosterone and human growth hormone in your body, which are vital for muscle growth and will also help to improve muscle mass when you train other areas of your body aside from your legs.

So squats can actually help you improve both your upper and lower body strength.

2. Functional Exercise Makes Real-life Activities Easier

Functional exercises are those that help your body to perform real-life activities, as opposed to simply being able to operate pieces of gym equipment. Squats are one of the best functional exercises out there, as humans have been squatting since the hunter-gatherer days. When you perform squats, you build muscle and help your muscles work more efficiently, as well as promote mobility and balance. All of these benefits translate into your body moving more efficiently in the real world too.

3. Burn More Fat

One of the most time-efficient ways to burn more calories is actually to gain more muscle! For every pound of additional muscle you gain, your body will burn an additional 50-70 calories per day. So, if you gain 10 pounds of muscle, you will automatically burn 500-700 more calories per day than you did before.

4. Maintain Mobility and Balance

Strong legs are crucial for staying mobile as you get older, and squats are phenomenal for increasing leg strength. They also work out your core, stabilizing muscles, which will help you to maintain balance, while also improving the communication between your brain and your muscle groups, which helps prevent falls – which is incidentally the #1 way to prevent bone fractures versus consuming mega-dose calcium supplements.

5. Prevent Injuries

Most athletic injuries involve weak stabilizer muscles, ligaments and connective tissues, which squats help strengthen. They also help prevent injury by improving your flexibility (squats improve the range of motion in your ankles and hips) and balance, as noted above.

6. Boost Your Sports Performance – Jump Higher and Run Faster

Whether you’re a weekend warrior or a mom who chases after a toddler, you’ll be interested to know that studies have linked squatting strength with athletic ability. Specifically, squatting helped athletes run faster and jump higher, which is why this exercise is part of virtually every professional athlete’s training program.

7. Tone Your Backside, Abs and Entire Body

Few exercises work as many muscles as the squat, so it’s an excellent multi-purpose activity useful for toning and tightening your behind, abs, and, of course, your legs. Furthermore, squats build your muscles, and these muscles participate in the regulation of glucose and lipid metabolism and insulin sensitivity, helping to protect you against obesity, diabetes and cardiovascular disease.

8. Help With Waste Removal

Squats improve the pumping of body fluids, aiding in removal of waste and delivery of nutrition to all tissues, including organs and glands. They’re also useful for improved movement of feces through your colon and more regular bowel movements.

Squat Varieties

Bodyweight Squat

First up, the traditional bodyweight squat. Keep your legs about hip width apart, push your hips back while bending your knees. Bend your knees to about a 90 degree angle and return to an upright position.

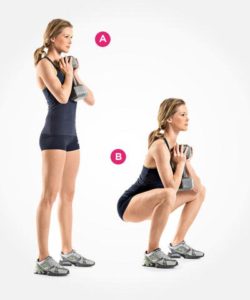
The dumbbell squat is just like the bodyweight squat with additional weight. Hold a dumbbell tight to your chest and don’t let it pull your chest forward as you squat down.

Kettle bell squat

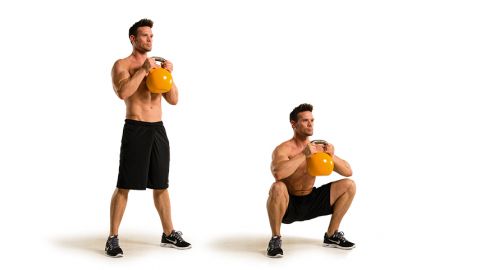
Similar to the dumbbell squat, is the kettle bell (or goblet) squat. And I’ll say it again, keep your chest high as you squat. Keep from arching your back.

Squat with weight bar

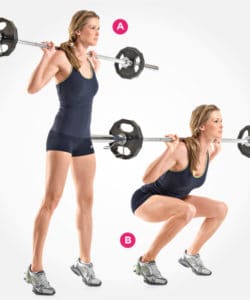
Another option is to squat with a weight bar.

Squat with weight

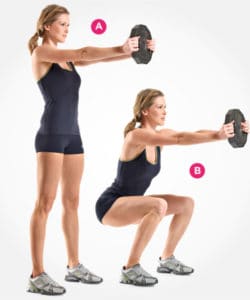
Another variation is holding a weight (could be a dumbbell too) straight in front of you. This will really challenge your balance, so keep your core tight to avoid leaning into the weight or letting it droop.

Wide Leg Squat

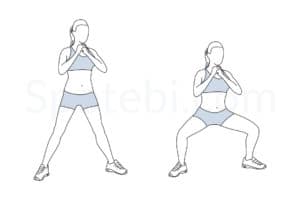
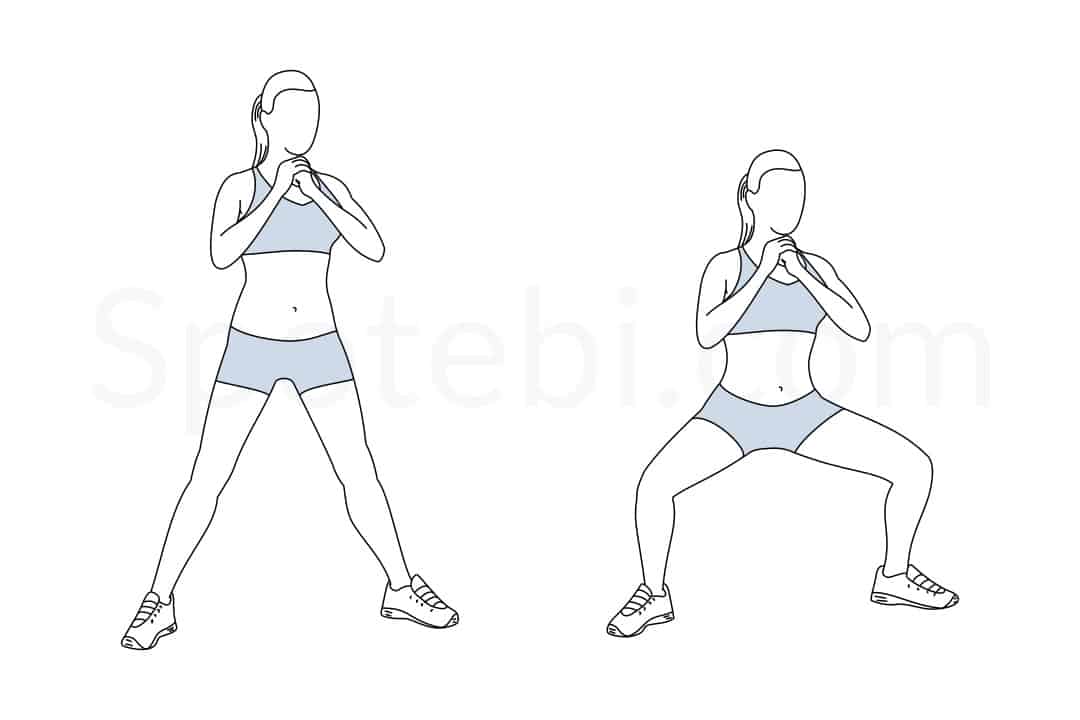
The next variation is the wide leg squat that will focus on your inner thighs. These can be done with or without added weights.

Conclusion

What is your favorite squat variety or workout? Please share in the comments!

Continue Reading