
Disclosure: This article includes affiliate links that will pay me if you decide to purchase using the link. There is no extra cost to you but helps me to run this site.
What is Kombucha?
In its simplest form, kombucha is fermented tea. It contains a large amount of probiotics, yeast, and bacteria. The same elements in yogurt, kefir, and kimchi. All are recommended foods to keep your gut health in check. Kombucha also helps fight invading bacteria to keep us well. By having a healthy colony of yeast and bacteria in your body, you are more likely to fight off infection early and less likely to get sick as often or stay sick as long.
At any grocery store, you’ll find a shelf or more dedicated to the drink, with fun flavors like cranberry, ginger, lemon, and watermelon. While I love the store-bought brands, at $3.50+ per bottle, this adds up quickly. It takes a little investment to get started brewing your own kombucha, but the cost per batch is very low, needing just tea and sugar new each time.
Items Needed
Teapot or Kettle
You’ll need a teapot or kettle to boil water and steep the tea. I love this HadinEEon Variable Temperature Electric Kettle from Amazon.com because of its wide opening (helpful for stirring to dissolve the sugar) and built-in filter through the spout (you don’t want any tea or other particles to enter your kombucha brew).

Black or Green Tea
You want a plain black or green tea kombucha base. Green tea will produce a slightly sweet but subtle tasting kombucha, while black tea creates a rich yet smooth flavor.
Organic Cane Sugar
Any sugar can be used, but organic cane sugar is recommended to keep your SCOBY healthy.
Fermentation Container
While you can ferment your kombucha in any glass container of at least 1 gallon in size, I recommend a vessel with a spout at the bottom. This way, you can easily bottle your kombucha through the spot and add a fresh tea mixture to continuously brew kombucha.

SCOBY
Most kombucha kits will include a SCOBY (Symbiotic Culture of Bacteria and Yeast), but you can also purchase on Amazon.com or get from a friend. As you brew, your SCOBY will grow baby SCOBYs that can be separated to start another batch, shared, or saved for the unfortunate event of a moldy brew. I’ve found the Fermentaholics brand to be very strong and effective.

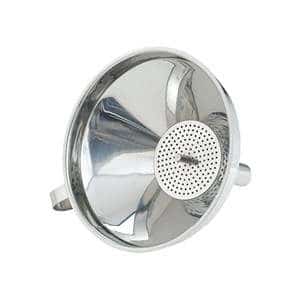
Funnel & Strainer
Used for moving kombucha from one container to another without any small SCOBY’s from being transported.
Bottles
Once your kombucha has finished brewing, you’ll need to bottle it up and refrigerate it. Kombucha builts up carbonation, so you’ll want to find a strong glass bottle that can withstand the pressure. With the flip-top, these bottles can be used over and over.

Brew Your Own Kombucha
1. Brew Sweet Tea
Boil 4 cups of water. Stir in 1 cup of organic cane sugar until dissolved. Brew 2 tablespoons of your preferred tea for 10 minutes.
2. Add Scoby
Add 10 cups of cool water to your fermentation vessel. Then add your brewed sweet tea. You want to make sure to filter out all particles so they don’t attach to your SCOBY and grown mold. Once the entire mixture is room temperature, add the SCOBY and at least 1 cup of SCOBY liquid.
3. Wait
Cover your kombucha with a cover or cloth and place in a dark, undisturbed location at room temperature. It’s recommended to be between 68 and 86 degrees Fahrenheit. I found that my basement was too cold, so now keep on the kitchen counter. My kit said to start tasting on day 4 and brew til your desired taste is reached. I find that I prefer stronger kombucha and will brew up to 2 weeks. At this point, you can either bottle and refrigerate to slow the fermentation or add a second fermentation
2nd Fermentation
Second fermentation is optional, but where all the fun flavors that you are used to are added. Add 2 tsp of your favorite fruit tea (or straight fruit) and 2 tsp of organic can sugar to each bottle. Filter kombucha from your 1st fermentation vessel and gently stir to dissolve sugar. Place your bottles in a dark, room temperature location. I use the bottle’s original shipping box and keep next to my 1st fermentation vessel on the kitchen counter. Taste and burp your bottles every 2 days so they don’t overpressurize. When kombucha reaches your desired taste, refrigerate and enjoy!

Kombucha
Equipment
- Teapot or Kettle
- Strainer & Filter
- Fermentation Jar
- Bottles
Materials
- 14 cups water separated
- 2 tablespoons tea black or green
- 1 cup organic cane sugar
- 1 piece SCOBY
Instructions
- Boil 4 cups of water
- Stir in 1 cup organic cane sugar until dissolved
- Steep 2 tablespoons of tea for 10 minutes
- Add 10 cups of cool water to fermentation vessel
- Add brewed steep tea to vessel, filtering to ensure no particles
- Once tea mixture is cool, add SCOBY and at least 1 cup of SCOBY liquid
- Cover the vessel with a dark cloth and leave in a warm place where it can be undisturbed
- Allow to ferment undisturbed. Check taste after 4 days, but can take up to 2 weeks.
- Once kombucha has reached desired taste, bottle. Can add aditional flavoring for a second fermantation or refregerate.
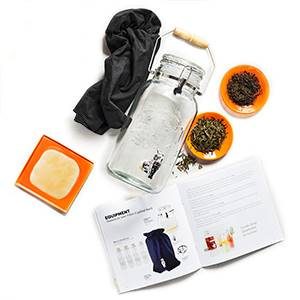
Get Started
Many starter kits are available to get started on Amazon.com. I started with the Sipology by Steeped Tea Kombucha Collection which includes: Kombucha & Party Entertainer (great container that can be used to serve lemonade or tea at any party, 1 set of 4 Brew n’ Serve Bottles, Funnel & Strainer, Kombucha Green Base, Kombucha Black Base, Universal Kombucha Cover, SCOBY, and Kombucha Guide.
Save For Later


6 Comments
im in the process of making my own kombucha, thanks for this 🙂
Wow, great post! I love kombucha but have never tried making my own. I think I might just give it a try with your guide, though, since a cold and fizzy drink is so refreshing on a warm day. Does it taste at all good/sweet after the first fermentation, or is the second fermentation really needed for a drinkable flavor? Thank you!
You can definitely drink after the first fermentation and stop the process while the kombucha still has some sweetness. Refrigerating the kombucha will stop the fermentation and leave the drink at its current sweetness level. I’ll drink quite a bit of the kombucha straight from the first fermentation container when I don’t have bottles readily available for bottling.
This recipe so easy to follow. I spend a lot of money at Wholefoods Market on Kombucha drinks. I can’t wait to try this at home, i am sure it will save me some $$.
OMG! I always wanted to make my own. This recipe is so easy to follow & simple. I love it! Thanks for sharing!
I’ve herd about the benefits of kombucha and seeing them sold at stores. Didn’t know it’s not hard at all to make it at home. Will definitely try soon!